SketchUp Solid Tools: Clean Intersections with Union, Subtract and Trim


You want to cut a window opening in a wall. You sink a box into the wall and clean up the intersection lines one by one. Half an hour later a face disappears and the model is full of holes. This is where SketchUp Solid Tools cut that tiring cleanup down to a few clicks. They calculate the intersection for you and leave a clean volume behind.
We have been teaching SketchUp for eighteen years. The place where students lose the most time is fixing overlapping parts by hand. Yet two properly prepared volumes merge or cut each other with a single command. This habit turns hours of work into minutes. It also removes the fear of breaking the model during revisions.
In this article:
- Which volumes do Solid Tools work with?
- The difference between Union, Subtract, Trim, Intersect and Split
- When does Outer Shell do the job?
- Cutting an opening in a wall, step by step
- Tips for repairing a model that is not solid
- Frequently asked questions
Which volumes do SketchUp Solid Tools work with?
SketchUp Solid Tools work only with solid volumes. A solid is a group or component with a closed volume. In other words, no face is missing. Also, every edge connects exactly two faces. Even a stray line or a face left inside breaks the volume.
So how can you tell? Select the group and open the Entity Info panel. If the selection is solid, the panel says so clearly. For example, the header reads Solid Group and a volume value appears. If the header only says Group, the tools will not work with that object.
That is why the first rule is simple: put every part that will intersect into its own container first. We explained the difference between groups and components in detail in our groups vs. components guide. Trying Solid Tools on raw geometry only wastes time.
What do the Solid Tools commands do?
You can reach the tools in three ways. They sit under their own heading in the Tools menu. You can also open the Solid Tools toolbar. And when you select two solids and right-click, the same commands appear in the menu.
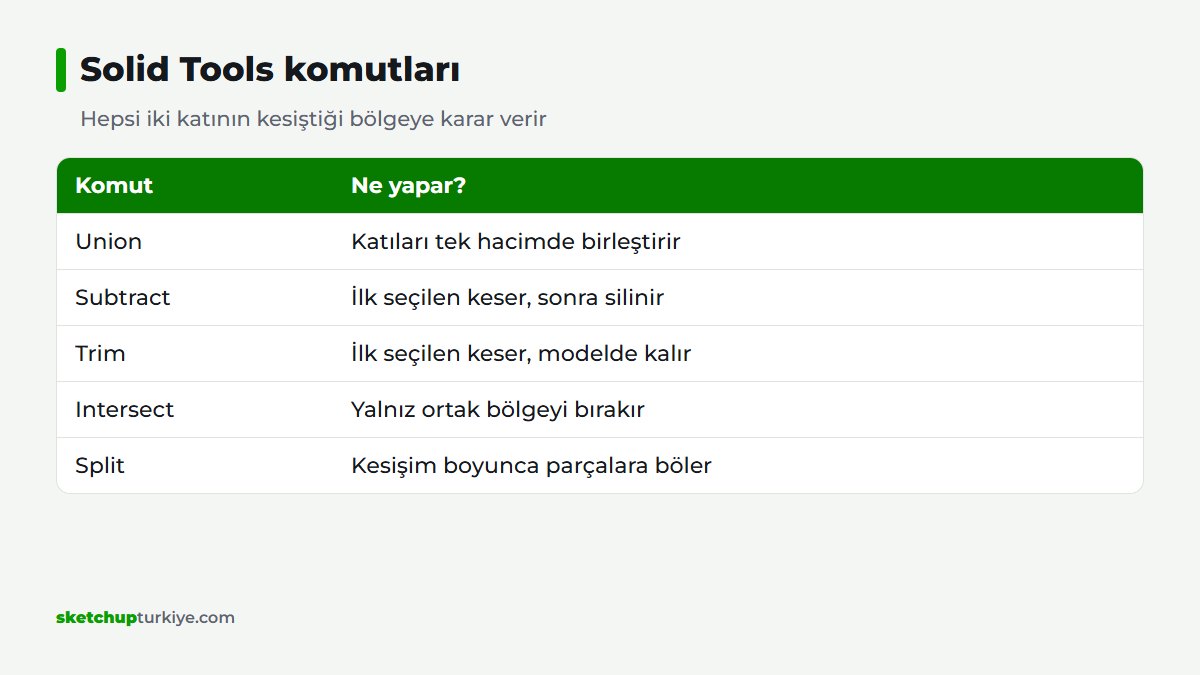
Each command makes a different decision about the area where two solids intersect. Once you get this difference down, you will pick the right tool right away.
- Union: Combines two or more solids into a single volume. It keeps internal voids.
- Subtract: The solid you select first cuts the second one. Then the cutting solid is removed from the model.
- Trim: Cuts like Subtract. But the cutting solid stays in the model.
- Intersect: Keeps only the shared area of the two solids. The rest goes away.
- Split: Splits the volumes into separate pieces along the intersection lines.
What is the difference between Subtract and Trim?
These are the two commands people mix up most. In both, the selection order matters. You click the cutting solid first, then the solid to be cut. For example, for a window opening you select the opening box first, then the wall.
Subtract deletes the cutting box after the operation. Only a clean opening remains in the wall. Trim leaves the box in place. This is very useful for parts like a door frame. The frame cuts the wall and also stays in the model itself.
If you reverse the order, the wall cuts the box. In that case, undo right away with Ctrl+Z. Then make the selection again in the right order.
Cutting domes and arches with SketchUp Solid Tools
Picture an arched door. First you turn the arch profile into a volume with Follow Me. Then, if you cut the wall with this volume, the arched opening is ready. We explained the Follow Me side step by step in our trim, railing and dome article.
When does Outer Shell do the job?
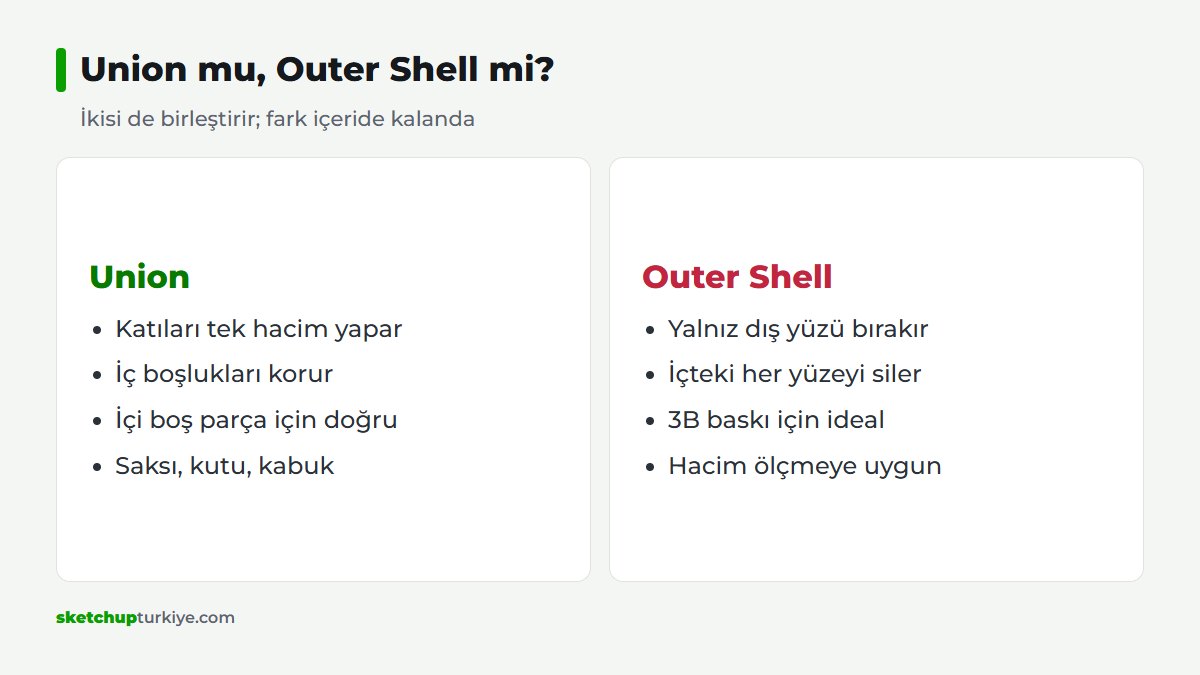
Outer Shell is similar to Union but does a harsher cleanup. It keeps only the outer faces of the intersecting solids. Every face and void left inside goes away. In the end you get a single closed shell.
This behavior is especially valuable for 3D printing. A printer needs a volume that is clean inside and closed. It also helps when you want to measure volume. You combine a few parts with Outer Shell and look at the value in Entity Info. Then you undo the operation.
But be careful: if an internal void is part of the model, Outer Shell destroys it too. For example, for a hollow planter, Union is the better choice.
Step by step: cutting an opening in a wall with SketchUp Solid Tools
We use the order below for window and door openings in our lessons. Once you get used to it, each opening takes less than a minute.
- Give the wall thickness with Push/Pull, select it and choose Make Group.
- Check in the Entity Info panel that the wall is solid.
- Draw a box the size of the opening; make it a little thicker than the wall.
- Group the box too, and position it correctly inside the wall.
- Choose the Subtract command, then click the box first and the wall second.
- If the frame should stay, use Trim instead of Subtract.
- Finally, confirm in Entity Info that the wall is still solid.
Making the box a little thicker than the wall is a small but important detail. That way the two faces do not overlap and the cut is clean.

Where do SketchUp Solid Tools save you time?
These tools are not just for wall openings. Most everyday drawing work involves an intersection. Instead of cleaning it up by hand, you leave it to the tool. Below we gathered the examples we come across most in our lessons.
A kitchen countertop is a good example. You need to cut openings in the countertop for the sink and the cooktop. You draw a box the size of the sink and subtract it from the countertop with Subtract. That way the countertop stays in one piece and the opening is exactly the right size.
On stairs, Union comes to the fore. You draw the treads and the stringer as separate groups. Then you combine them all into a single volume. That way the stair moves like a single object and looks clean in section.
A stair opening in a slab or a chimney hole in a roof is cut with the same logic. Small cuts like a handle recess in furniture or a cable hole in a shelf also take seconds with Subtract. And for models prepared for physical scale models or 3D printing, Outer Shell gets the file ready for the printer.
In short, think of these tools wherever two parts touch. A clean intersection makes every later revision easier too.
What to do if the model is not solid
Sometimes Entity Info does not say solid and the tools do not respond. There are a few typical reasons. For example, a face is missing, or an extra line is left inside the group. Sometimes two faces share the same edge with a third face.
First double-click into the group and delete any dangling lines. Then close the missing face with a line. Also move nested groups out. A free extension called Solid Inspector also highlights problem edges in color. For more information, see SketchUp’s Solid Tools help page.
These tools slow down on heavy models. So do the intersections on small parts. To clean out unnecessary detail, also take a look at our reducing file size guide.
Frequently asked questions
Why are SketchUp Solid Tools not working?
Most of the time the object you selected is not solid. Clean up missing faces and extra lines until you see the word Solid in the Entity Info panel.
Are Union and Outer Shell the same thing?
No. Union keeps internal voids, while Outer Shell keeps only the outer shell. For a hollow part, choose Union.
Is the part still solid after a Solid Tools operation?
If the cut is clean, the part stays solid. Still, do a quick check in the Entity Info panel after each operation.
Instead of cleaning up intersections by hand, prepare the volumes properly and leave the job to the tool. Tonight, try cutting an opening in a wall in your open project with Subtract. Once you get used to it, revisions are no longer a nightmare.